GOLD LEAF GILDING
Discover the two main gold leaf gilding techniques and their results.
Discover the rangeWhat is gold leaf gilding?
There are two main gold leaf gilding techniques; fixing the gold leaf with a water or oil-based adhesive size, or water-gilding, which involves creating your own adhesive surface with Gilder’s Clay or Bole. Each technique is suitable for different types of supports and settings, and delivers different results.
The simplest method is to apply the leaf directly to your prepared surface with a fluid oil or water-based adhesive size.
The more intricate method, known as water-gilding or ‘gilding on bole’, involves applying the gold leaf over a layer of Gilder’s Clay, called bole. This technique has been used throughout history for icons, frames and wood. The colour of the clay subtly shows through the gold, giving your finished surface rich depth and facets. Water gilding allows the gilder to burnish the surface, for a richer shine. This cannot be done with the size-only method.
You should choose your technique based on your setting and the surface you’re using. All exterior projects, interior stone and metal will require an oil-based size. You can only use the water gilding technique or a water-based size for interior gilding on plaster and wood.
Surface preparation
Before applying gilding size or bole, your surface needs to be sealed and ready to receive it. To do this use gesso or shellac.
Both can be built up in layers and sanded once completely dry.
Gesso gives a smoother base layer to build from, while shellac will retain the natural grain or texture of your surface. You can also apply shellac over your dry gesso base to seal it. We offer a choice of clear and blonde shellacs.
WATER GILDING (GILDING ON BOLE)
Gilder's clay, or bole, can be used with oil and water-based sizes. It is used to give a stable and flexible foundation for gilding interior-based wood or plaster. It ensures a high quality, homogeneous and lasting surface. Before application, the clay always has to be diluted with rabbit skin glue. This softens and thins the clay and acts as a fixative. Following application, bole allows you to polish the gold with a burnisher to obtain a smooth, brilliant finish.
Traditionally, clays were simply the colour of the earth from which they were dug. Now they come in a variety of colours. The clay’s colour appears through the gold slightly, giving the surface its final tone.
To prepare bole, mix one part clay with two parts of a tepid solution of Charbonnel Rabbit Skin Glue. Make sure your gilding surface is properly sealed, then carefully spread the clay base on in successive layers. Always leave it to dry between applications. Once the final layer is completely dry, the surface can be sanded with at least 400 grit sandpaper. You can also be polish the bole with a cloth before gilding. A water or oil-based size is then applied to the clay with a good size brush.
Charbonnel Gilder's Clay Base is a finely ground clay base, available in yellow, red and black. These colours can be mixed to create new colours. Our Gilder’s Clay Base must be mixed with rabbit skin glue before use.
SIZE-ONLY GILDING
A simpler process to traditional water gilding is size-only gilding.
Typically, this technique produces less lustrous effects as the leaf cannot be burnished. This is because the leaf film remains supple even when dry. You should consider your project’s surface and location when deciding whether to use an oil or a water-based size.
Oil-based sizes are perfect for stone, metal, exterior plaster and wood. This includes gates, railings, monuments, statues, cupolas, walls, roof timbers and lead figures.
Water-based sizes are more suitable for interior projects, with wood and plaster bases.
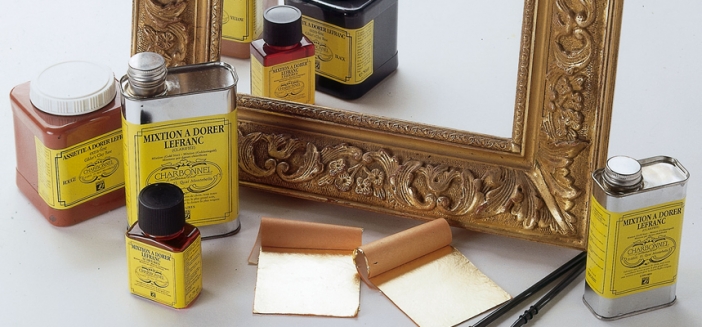
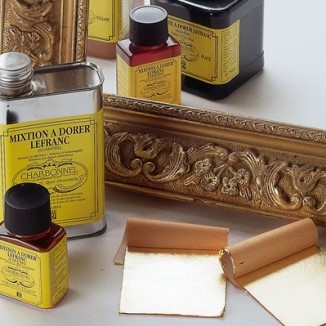
Oil-based Size
Oil gilded surfaces are more water-resistant and durable than water-gilded surfaces, allowing them to withstand weather extremes. If using a less expensive base metal leaf, like Dutch metal or aluminium leaf, choose the oil method.
We offer two types of lead-free, oil gilding mixtures to choose from; Gold Size 12 Hours and Gold Size 3 Hours. Each mixture is designed for different locations and size applications.
Gold Size 12 Hours is best suited for large surfaces, exterior work, in dry and dust-free climates. This mixture gives a more brilliant, rich and resilient finish than our Gold Size 3 Hours.
Gold Size 3 Hours is designed for smaller surfaces, interior work and humid and dusty climates. It should also be used when your conditions are not suitable for Gold Size 12 Hours.
For both sizes, setting time is dependent on environmental conditions. In dry weather you can typically transfer gold leaf 1-2 hours earlier than the time indicated by the mixture. Both mixtures can cope with temperatures as low as -5 °C.
Water-based Size
Our water-based size is ideal for interior wood and plaster. Made from an acrylic resin-based formula, it is water-soluble and designed to be applied in thin layers.
For maximum absorbency, thin the first layer with 20% water. Following this, apply a second, undiluted coat. Leave it to go tacky for at least 20 minutes before you apply the leaf. After application, this mixture should be slightly sticky. It will be ready to receive leaf for up to 24 hours.
Gold leaf application
Once the size has dried to a tack level similar to sticky tape, it is ready to receive the leaf. Never lay the leaf while the size is still wet.
Gently lift the loose leaf from the booklet using a gilder's tip and apply to the size-covered surface. If the leaf needs cutting before application, transfer it to a cushion and make cuts as required. With a light hand, gently smooth the leaf with a soft gilder's brush and tamp the leaf into any intricate areas of the moulding.
After all the leaf is laid, leave it for a few hours to allow the size to dry out beneath the leaf.
Once dry, gently brush away all the loose skewings (odd bits of leaf that are attached on the overlaps). Next, brush over the whole surface lightly to create a soft burnish on the leaf. If there are any gaps in the leaf, touch these up with your skewings.
Sealing
Genuine gold leaf of a high carat (22ct and above), aluminium, palladium and platinum will not oxidise. This means that it does not need to be sealed, unless it is located in areas where it could be scratched. It will look more attractive unvarnished. Lower carats of gold and most other metal leaf alloys can oxidise and should be sealed.
Shellac is used as a fast-drying final varnish to protect your gilded surface and prevent tarnishing. It can also be used to seal absorbent surfaces before sizing, or for sealing gesso prior to gilding. We offer clear and blonde shellac options.
GILDER'S TOOLS & ACCESSORIES
Because gold leaf is so thin, it adheres to anything with the slightest amount of moisture, including your fingers. Specialist tools are required to handle, cut, fix, burnish and finish gold leaf.
Gilder's Cushion
Gilder’s cushions are used as safe surfaces to cut and handle your metal leaf. They feature suede, leather or velvet-covered pads, offering smooth surfaces that won't tear the leaf.
Our gilder’s cushion is made in Italy and features a strap in the corner to hold your book securely.
Gilder's Knife
Gilder’s Knives are used to cut your gold or metal leaf to size on your gilder’s cushion. Ours has a precise, straight double-edged blade.
Gilder's Tip
The gilder's tip is a thin card set with squirrel hair bristles. It is designed to pick up the leaf without breaking it. Gilder’s tips allow you to move gold leaf from the book to your cushion or gilding surface.
Gilder's Glue
Gilder's glue is traditionally made from rabbit skin. It’s an essential substance in the water-gilding method, used to dilute and fix the bole. Our rabbit skin glue is in granule form.
These are dissolved in warm water to create an adhesive fluid. Use a ratio of 5-8g of granules to 100g water.
Gilder's Brushes
Different brushes are required for each different stage in gilding. We offer four styles and a complete brush set.
Our Poliment brush is used with gilder's clay to polish up the surface when dry before the leaf is applied. It's an extremely hard brush, tied with Kolkata silk thread. Rondin brushes are used to push the gold leaf onto your gilding surface with a water-based or oil-based size.
Tamping brushes are used for pushing the gold leaf onto the gilding surface. They are always used dry. The Finishing brush has soft bristles tied with silk and is used to lay your varnish top coat.
Our 13-piece brush set gives you everything you need to gild, from mixing to application brushes.
Water Gilder's Burnishing Agates
Burnishing is an integral part of the water gilding process. It gives gold leaf its distinctive mirror shine.
Burnishing tools are made from polished, shaped agate rocks that are mounted onto wooden handles. They are gently but firmly rubbed over the gold leaf after it's been applied to give it a highly reflective lustre. We have a range of silhouettes to choose from.
Burnishing should always happen at least one hour after the gold leaf has been laid.